Bryant Labs
Seismometer Electronics
![]()
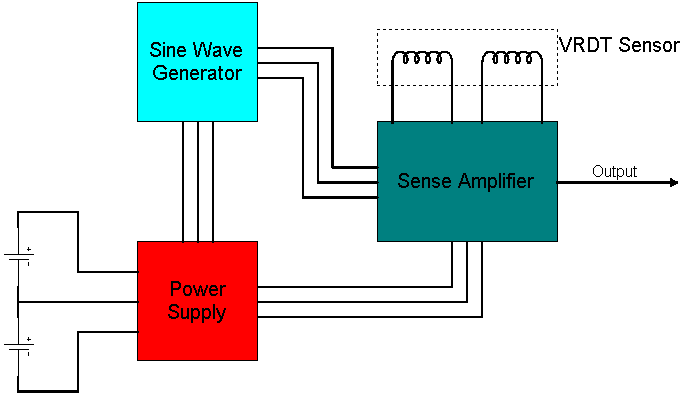
My version of the Vertical Broad Band (VBB) Seismometer as originally described by Sean-Thomas Morrisey uses electronics which I designed based on his original overall architecture. The electronics Sean-Thomas used were put together from modules he had available to him, and weren’t particularly optimized for this one application. He published the schematics, so once I figured out what the circuits were doing, I redesigned them using somewhat more modern components, and leaving out the unused sections. The block diagram below shows the overall signal flow, and acts as links to the schematics for each section.
Click on either of the three boxes in the block diagram to bring up the
associated schematic in PDF format. In most browsers you can also right click
on the box and bring up the schematic in a new window.
Note: Acroboat Reader is available for free at
www.adobe.com
The power supply is fairly simple. A transformer reduces the mains voltage down to about 20 Volts AC with a center tap. With a basic diode bridge and large capacitors, this is converted to about +- 12V DC. The two supplies then pass through diode switches before going to LM317/LM337 regulators which are set up to provide regulated +- 9 Volts to the rest of the circuitry. The diode switches are included to allow for a battery backup. I have a pair of 12 Volt, 4 amp-hour batteries attached to the system which are trickle charged while mains power is available. When AC power goes away, power is routed to the regulators from the batteries through the diode switches. I haven’t measured the run-time while on batteries, but it should be at least a couple of hours.
To supply a clean, stable, balanced sine wave to the sensor, we start with an LM336 Five volt reference diode. This voltage is buffered by U1A, and inverted by U1B to provide +-5.00 Volts DC as a supply for the oscillator. I used an Intersil 8038 function generator chip as the oscillator. This part works by creating a triangle wave. This is then squared and the square wave is subsequently turned into a sine wave via a diode/resistor shaping circuit. It is capable of doing FM modulation, as well as some variations on the basic waveforms. In this circuit, it is configured to be just a sine wave generator. R6 and R7 adjust the frequency and symmetry of the original triangle wave. These are set for about 5 KHz via multi-turn trim pots. C6 sets the frequency range, and R8 trims the sine wave for lowest distortion.
U1C drives the transformer. R11 is included to adjust the drive level. The output side of the transformer is center tapped, and the tap is tied to ground to give two balanced output signals. You will notice that I have included low pass filtering on most of the amplifier stages. One rule I always design to is to never amplify frequencies I don’t need. So, whenever I have an op-amp configured for an amplifier, I add a small feedback capacitor to roll off the gain above the highest frequency I care about. This technique can help to reduce noise throughout the system.
U3 takes the output signal after the transformer and detects the zero crossing points. This becomes the “SYNC” signal which is used later in the synchronous demodulator. You might wonder why I didn’t just use the Square ware output of the 8038. The problem is that subsequent processing delays and filtering cause it to be out of phase with the sine wave.
The sensor is a Variable Reluctance Differential Transformer (VRDT). It is constructed as two windings with a gap between them. In this gap is a vane of transformer core material attached to the boom of the seismometer. In normal operation, the boom and the vane are centered. The two windings form the lower two arms of a basic Wheatstone bridge. The upper arms are formed by R16-R23. This looks a bit complicated, but if you follow from the Phase2 input in the upper left of the schematic you come first to R19. This is used to fine tune the balance of the bridge. The 22.6 ohm resistors and S1 are used for calibration, putting a known amount of imbalance into the bridge. S2, R18, and R23 are used for bridge adjustment, substituting a perfectly balanced pair of resistors for the inductive sensor. P1 connects to the sensor.
As the boom moves, the vane moves closer to one winding or the other, unbalancing the bridge. The sense amplifier detects this and amplifies it. U4 is an INA101 Instrumentation Amplifier. This is basically a pure differential amplifier. R16 sets the gain at 100. The output of this amplifier is a sine wave at the same frequency as the oscillator. The amplitude varies with the position of the sensor vane. The direction of the deflection of the boom determines the phase of the signal. It will be in phase with the oscillator (Phase1) on one side of center, and out of phase on the other side.
To turn this sine wave into a DC signal representing the position of the vane is the job of the Synchronous Demodulator. This sounds complicated, but it is fairly simple. You know that diodes are not perfect - there is a drop of about 600 mV across a diode when turned on, and the drop varies with temperature. Since we only care about signals which are of the same frequency and phase as the oscillator, we can instead use a solid state switch to do the rectification. In this circuit, U5A, and R24-R27 are configure as an amplifier which provides a gain of either +1 or -1, depending on the state of the SG201 switch, U6. U6 is either open, when SYNC is low or closed when high. The other side of the switch is tied to ground. So, when Phase1 is above zero, SYNC is low and R25 is not tied to ground. In this situation, U5A behaves like a buffer. When Phase1 is below zero, SYNC is high, tying R25 to ground. Now U5A has a gain of -1. The resulting output of U5A looks like a perfect full wave rectification of the input signal - a series of half sine pulses either above or below zero volts depending on the input phase.
The carrier is then filtered out by the two stage filter consisting of R30, C17, R31, and C18. The filter output is buffered by U5D. The final output is driven by U1D, which has adjustable gain. I chose the LM837 for it’s output drive capability, since I used U1 to drive transformers and cables. U5 was chosen for it’s low noise specifications, as it is used in some of the more sensitive parts of the circuit.
On the same page with the Sense Amplifier is the feedback amplifier. The real magic of Sean-Thomas’s design is the use of active feedback to stretch the natural period of the seismometer out to 60 seconds or more. Those of you familiar with control theory will recognize the circuit around U5B and U5C as a Proportional-Integral-Differential (PID) control circuit. The values of the resistors and capacitors are as designed by Sean-Thomas, who was a MathCad wizard. The Proportional part of the feedback is simply provided by R40. The Differential part comes from C23-C25, which are paralleled to give a 24.7uF capacitor. Finally, the Integral part is calculated by the filter consisting of R23 and C19-C22. The combined signal is buffered by U5C, and the correct portion added to the feedback signal by R39. The feedback signal is applied to the voice coil on the seismometer.
One thing I changed about the system was the method for removing signals beyond the desired period - slow DC drifts. In the original, the output signal was simply decoupled through a large capacitor. My experience was that they had high leakage currents, which showed up as even worse offsets on the output. I instead used U5B to add another term to the feedback equation. I used the same R and C values as Sean-Thomas, but I configured them as a low-pass filter, and fed the resulting signal back to the voice coil. The result has been very successful. Now any leakage current through the capacitor shows up as a gain error instead of a DC offset. This is easily calibrated out by the final stage gain adjustment.
![]()
Last Revised: 12-October-2003